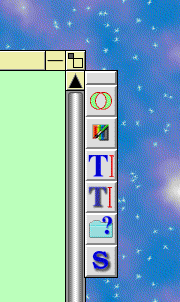
 !Compo 1.18j introduced a number of new features. One of these is the ability to integrate CompoScripts as ‘scriptlets’ accessible from a button bar. This bar now appears near the top right of the canvas as shown on the left.
As shown here, the scriptlet bar contains a pair of icons which you won’t see by default with !Compo 1.18j. To illustrate the use of scriptlets, I have written two examples which you can use and examine. You can download these by clicking here to fetch a (68kbyte) zip archive which contains the files plus some supporting resources. The top two icons shown in the illustration of the scriptlet bar are for the examples available from this page, so will only appear once you have installed the examples as described below.
Note that the examples aren't meant to be outstanding examples of superb programming, although you may find them useful or amusing. They are really meant just as illustrations so you can see how scriptlets can be written, added to !Compo, and then made to work. Note also that these examples use !CompoBits as a place to store resource files for the scriptlets. This is just something I find convenient as a centralised location for holding files. You don't have to use this for composcript files of your own unless you wish to. !CompoBits simply sets a path, <CompoBits$Dir>, which can then be used by scripts or scriptlets to locate files they want to use.
There are two examples in the zip:
- “Fred”. This automatically generated textured text which is then given a blurred drop shadow. There is also an option to automatically create a ‘cut out’ where the text appears to be cut out from a rectangle of a texture.
- “Framer”. This automatically masks and frames a selected object with a chosen shape and line/pattern. The example shapes provided are DrawFiles, but ArtWorks files or other types of file can be used if you prefer.
- Click on the scriptlet button bar with the <menu> mousebutton. This pops up a menu.
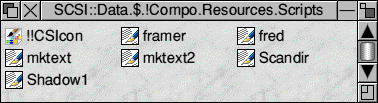
- Select “Show Scripts” from the menu. This opens up a filer window showing the scriptlets which Compo currently holds in “!Compo.Resources.Scripts”.
- Drop copies of the textfiles “Fred” and “Framer” into this directory. The illustration above shows what this will look like once the new scriptlet files have been added.
- Load the sprite file “!!CSIcon” into !Paint, then add the new sprites “cs_framer”, “pcs_framer”, “cs_fred”, and “psc_fred”. Save the new copy of “!!CSIcon” back into the scripts directory.
- Place a copy of “!CompoBits” somewhere on your computer where the filer will ‘see’ it before you use the new scriptlets. (You may have to reboot or double click on “!CompoBits” the first time around to make sure Compo doesn’t think it is still inside the zip archive.)
- Click with the <menu> mousebutton on Compo’s scriptlet button-bar. Then select “refresh” to make Compo find the new scriptlets. At this point the new icons should appear on the scriptlet bar.
You should now see two new button icons on the bar.
 The first of these is shown on the left. This icon is the button for the “Framer” scriptlet. When you put the mousepointer over this you should see the text “Frame and mask images” appear just above the palette bar along the bottom of the main !Compo canvas window. This line automatically displays a short text from the scriptlet whose button is under the mouse pointer. This is an aid intended to remind you of what each scriptlet does.
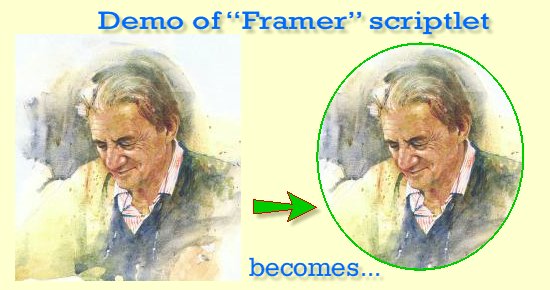
Select a bitmap object on the canvas and click on this button with the <select> mouse button. A menu will pop up offering you three named shapes. Choose one and see what happens. The results should be similar to the illustration shown below. Note that the effect of the ‘rings’ shape is fairly silly for most purposes, but shows the flexibility of the method. For the example below the ‘circle’ frame was chosen. (Ok, ok, I should have called this shape ‘ellipse’...)
 The second icon is shown on the left. This is for the “Fred” scriptlet. When you click <select> on this it asks you to choose from a selection of three textures. You are then invited to type in some text and choose a style for the application of the textured object. The image shown below displays typical output created using this scriptlet.
The details of how the two examples work are explained on later pages. Here I will just summarise some of the remaining features of the scriptlet bar. The first feature is one we have already seen – i.e. that a <menu> click on the bar will pop up a menu from which you can open a filer window showing the scriptlet files. You can use this to locate the files for editing, copying, etc. Alternatively, if you hold down the <Ctrl> key when pressing select over one of the scriptlet buttons, the relevant scriptlet file will be “Filer_Run” and hence should load into your favourite text editor. This is useful when you want to modify or write scriptlets. For example, you can do this to quickly change the font name or font size used by the above scriptlet. Of course, scriptlets are also standard CompoScript files, so they will usually work by ‘drag and drop’ onto the !Compo canvas, but you won’t normally use them that way as the buttons are more convenient.
Finally, note that !Compo ‘scans’ the contents of the script directory when it starts up. After that you can edit existing scriptlet files and the changes will take effect the next time the scriptlet is run. This is due to CompoScript being an ‘interpreted’ language so program changes can have an immediate effect. !Compo reads the file each time the relevant button is clicked. Note, though, that if you change the scriptlet file name, or create a new file whilst !Compo is on the icon bar, you should click <menu> over the scriptlet bar and select the menuoption to “refresh” the scripts. This allows !Compo to detect that the list of scriplets has changed. If you don’t do this, new scriptlet files may be ignored until you rerun !Compo.

Content and pages maintained by: Jim Lesurf
using HTMLEdit, Compo, and TechWriter.