DrawGen part 3 – BASIC points.
Although not obvious from previous articles DrawGen was originally written by me *in* BASIC and for use *from* BASIC. That said, I ‘moved on’ to ‘C’ a few years ago, hence the emphasis in this series on that language. The main disadvantage when using DrawGen from BASIC is that I haven’t written a library of functions to make things easier. However, the ‘help’ file which comes with DrawGen contains quite a lot of info for using BASIC so here I’ll just give a couple of simple examples so you can see how to go about using that information.
REM First example
:
REM First open/create the file
out%=OPENOUT "Ram:Example1"
:
REM Then save a DrawGen instruction to the file
PRINT# out%, "rectangle",100,200,300,400
:
REM Then close the file when finished
CLOSE# out%
:
REM Now issue a 'star command' to tell the DrawGen module
REM to go ahead and turn the file into a DrawFile
*DrawGen Ram:Example1
END
The above program shows how to use DrawGen commands in a BASIC program. The process has four stages:
- Open a file to save the commands;
- Save the commands as a series of instruction strings followed by appropriate values (integers);
- Close the file;
- Issue a star command telling DrawGen which file you want converted from a set of commands into a real DrawFile.
In the above example I used immediate values, but you can also do something like
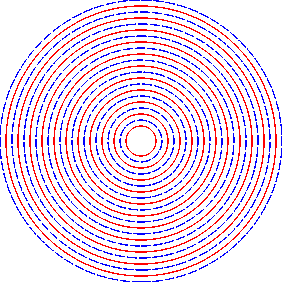
REM Example 2
REM Open the file
output%=OPENOUT "Ram:Example2"
:
xcenter%=500 : ycenter%=500
:
radius%=50
:
FOR i%=0 TO 400 STEP 40
PRINT# output%, "linestyle", 0
PRINT# output%, "colour", "red"
PRINT# output%, "circle", xcenter%, ycenter%, radius%+i%
PRINT# output%, "linestyle", 4
PRINT# output%, "colour", "blue"
PRINT# output%, "circle", xcenter%, ycenter%, radius%+i%+20
NEXT
:
CLOSE# output%
*DrawGen Ram:Example2
END
So, just as with the ‘C’ examples you can create graphics using variables. There are a couple of much more complex BASIC demo programs inside the !DrawGen application if you want to try them.
To be honest I suspect that’s probably all I need say about using DrawGen from BASIC as, once you’ve seen the examples I suspect you can do everything else from the help file. If not, please let me know and I’ll be happy to answer any questions. Before reverting to my familiar ‘C’ I should say something which probably gives my age away! It should be obvious from the above examples that, in principle, you can use DrawGen from *any* language as all you have to do is put the appropriate commands into a file and then tell the DrawGen module to convert it. So, for those of you who use FORTRAN: (there goes my age clue!) I have a set of subroutines which makes using DrawGen from FORTRAN a bit easier. If you would like these, or want to ask any questions about DrawGen, please contact me via Archive or directly via email <jcgl@st-and.demon.co.uk>.
Looking at the second example above, you can see that I have sneaked in another ‘new’ DrawGen command, “linestyle”. The ‘C’ command for this is
DG_linestyle(style_number);
where style_number is an integer which sets the line style to be used until further notice. The default linestyle is 0 which gives the predictable continuous line. At present there are just 8 linestyles defined.
The final thing I want to cover is curved lines – specifically Bezier curved paths. You can include Bezier curved paths in a ‘path’ using the command
DG_curve(xc1,yc1,xc2,yc2,x2,y2);
This works in a similar way the the ‘DG_draw’ command in that it draws a line from the present drawing location to another place, but now it draws a Bezier curve rather than a straight line. The easiest way to understand how it works is, as usual, by examples.
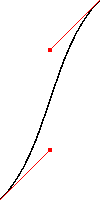
Bezier1 simply draws a single curved line
/* demo of Bezier curves in a path */
#include <stdio.h>
#include "DGLib.h"
int x1, y1, x2, y2;
int x1_control, y1_control;
int x2_control, y2_control;
int main(void)
{
DG_open("ram:curves\0");
x1=100; y1=100;
x2=300; y2=500;
x1_control=x1+100; y1_control=y1+100;
x2_control=x2-100; y2_control=y2-100;
/* Create a path which just contains a Bezier curve */
DG_path(x1,y1,5,0,-1);
DG_curve(x1_control,y1_control,x2_control,y2_control,x2,y2);
DG_end();
/* Now show where '!Draw' would put the control points */
DG_colour("red");
DG_rectangle(x1_control-2,y1_control-2,4,4);
DG_line(x1,y1,x1_control,y1_control);
DG_rectangle(x2_control-2,y2_control-2,4,4);
DG_line(x2,y2,x2_control,y2_control);
DG_make();
}
This shows how the curvature of the line is determined by the locations of two control points with respect to the two actual endpoints of the line. Applications like !Draw, !Vector, etc let you show these on screen when editing and you can drag then around and get a feel for how moving them alters the curved shape.
Bezier2 uses a series of Bezier curves to draw a wiggly line:
/* demo of waggly line using Bezier curves */
#include <stdio.h>
#include "DGLib.h"
int x1, y1, x2, y2;
int x1_control, y1_control;
int x2_control, y2_control;
int x[5], y[5];
int i;
int main(void)
{
x[0]=100; y[0]=200;
x[1]=200; y[1]=500;
x[2]=350; y[2]=150;
x[3]=500; y[3]=250;
x[4]=300; y[4]=600;
DG_open("ram:wiggle\0");
/* Create wiggly path */
DG_path(x[0],y[0],5,0,-1);
i=1;
do
{
x1_control=x[i-1]+(int)(y[i]-y[i-1])/2;
x2_control=x[i]-(int)(y[i]-y[i-1])/2;
y1_control=y[i-1]+(int)(x[i]-x[i-1])/2;
y2_control=y[i]-(int)(x[i]-x[i-1])/2;
DG_curve(x1_control,y1_control,x2_control,y2_control,x[i],y[i]);
i++;
} while (i<5);
DG_end();
DG_make();
}
This wiggly line isn’t meant to represent anything, it just shows you can generate quite complicated curved shapes. Although I’ve not given an example here, you can mix straight lines (DG_draw), and curves and movements (DG_move) in a path to get almost any shape you can imagine. The path can be coloured and filled as you like with the DG_path command which starts it, and you can preceed the path with a DG_linestyle if you want some kind of broken line. Taken together, these commands should give you the ability to make any kind of line or shape that you need.
That’s all I plan to write in this series, but if you have any questions please let me know. Thanks for reading and have good fun with DrawGen! :-)
Jim Lesurf